1. Open “Windows Live Movie Maker” (you may have to search your computer for it!)
2. At the top, click on “add videos and photos” 3. Go and find the movie clips and/or pictures you would like to add 4. You images and clips will be added to your movie in the order you choose them. You can rearrange them by clicking and moving them around 5. Once you are happy with the arrangement, let’s add sound 6. At the top, click on “add music” 7. Go and find the music clip you would like to add 8. You music should appear 10. Now, let’s publish your movie 11. Click on the main Movie Maker button (to the left of the “Home” button) 12. Select “Publish Movie” and choose “Youtube” 13. Choose 640 x 480 (this just ensures the video is small enough to be published on youtube) 14. Sign into the required accounts. This is often Windows Live AND YouTube. Your usernames/passwords may not be the same! You may need to make a Windows Live login. 15. Follow the prompts to publish 16. Leave Windows Live Movie Maker open while publishing 17. Once done, (you will get a message stating it is finished) visit your movie on YouTube. Copy the embed code and paste the embed code into your weebly website You can record anything that appears on your screen using Screencast-O-Matic (SOM). Once you are done recording, you can 1) save your video to your computer, 2) upload your video to youtube or 3) upload your video to the SOM website (costs $$).
Here is a quick tutorial to help you get started. 1. go to Screencastomatic.com 2. click on "start recording" 3. You might get asked questions, choose "yes" or "run" 4. If SOM finds an existing recording click "delete" 5. Toggle the dashed lines to fit what you want to record 6. When ready, click on the red dot (SOM will count down and then you are recording) 7. When ready, click on the blue dashes to stop the video 8. Click on "Done" to begin the publishing process 9. In the screen that appears choose your method of saving (to your computer or to youtube). I recommend publishing to youtube) 10. After clicking, "publish to youtube" fill out the blanks that appear 11. The first time, you will be asked to login to your youtube account (the same login as your gmail login) 12. A screen will tell you how much of your video has uploaded to youtube. Once it finishes, it will give you a URL to follow. 13. Go to your video URL and click on "share" and copy the embed code 14. Login to your weebly editor 15. Embed your Screencast video into your website. Are you using Google Docs in your classroom yet?
If not, why? It is a TOTAL game-changer. One of the easiest ways to use Google Docs is to make a form for survey and assessment purposes. Google even gathers the data for you and will export it to you an Excel spreadsheet (if you ask). Another is to use Google Docs as a "ticket out the door." A CCSD elementary Art teachers uses Google Docs every day as her "exit slip." Check that out here. Additionally, you can make documents in Google Docs that multiple people can edit at the same time. Awesome news for group projects. In order to use you Google Docs, you need have a google account (if you have a gmail account, you already have a google account). The steps below walk you through making a simple form/survey in Google Docs. MAKING THE FORM 1. Go to http://drive.google.com 2. Login to google or make an account 3. Click on "create" and choose the green icon labeled "form" 4. You are now going to make a survey/quiz 5. In the "Untitled Form" window, give the form a title 6. Draft your 1st question 7. Click on the different options to find the best source for student/parent response 8. As you finish the question, click "done" and Google will make another question field for you 9. This is designed to be incredibly intuitive, so the best thing is to click about to find you way 10. Once your form is complete, click on "Send Form" button in the top right-hand corner EMBEDDING THE FORM INTO YOUR WEBSITE 11. After you click on "Send Form" a window will appear. You can choose to copy the URL link which will send people to a webpage wherein the quiz will be available. OR you can click on "embed" and copy the code that appears. If you choose you "embed" your students/parents can take the quiz directly from your website. For this project, we are choosing "embed." Choose "embed" and copy the code that appears. 12. Login to your weebly website and click on edit 13. Find the place you want your quiz to appear 14. Drag over the "embed code" option from the "basic" blog editor window 15. In the box that appears, paste the code you copied from your Google form 16. Click on "post" 17. Click on the link that appears 18. You should see your quiz live on your website! EXAMINING THE RESULTS OF YOUR FORM 19. Go to http://docs.google.com 20. Click on the horizontal lines next to "docs" 21. Choose the green icon labeled "sheets" 22. You should see the title of your quiz/form 23. Click on your form title 24. You should see the results 25. To take this to excel 26. Click on "File" and choose "download as" 27. Choose Microsoft Excel 28. Your Excel doc with your results should download! Ta-Da!! Slideshare
How often are you making new presentations to introduce students to material? You are re-inventing the wheel, because there are literally thousands of pre-existing presentations you can download (and some you can even edit). There are two (very easy) ways to do this. My favorite is Slideshare. You can download presentations from Slidshare, upload your own presentations to Slideshare, AND you can get an “embed” code from uploaded presentations to share the presentations on blogs and websites. Sourcing Presentations on Slideshare 1. Go to www.slideshare.net 2. Put your keywords in the “search” bar 3. Choose a presentation to view 4. Click on “save” to download the presentation (usually is saves to your “downloads” file) 5. Open your presentation (it will automatically open in the program it was created in) 6. Usually you can edit the presentation 7. If you re-share the presentation or use it professionally, make sure to cite the original url used to download the file Uploading Presentations to Slideshare 1. Go to www.slideshare.net 2. Click on “signup” and follow the prompts to make a free account 3. Login 4. Click on “upload” and follow the prompts to add a presentation Embedding Slideshares into Websites and Blogs 1. Go to www.slideshare.net 2. Find the presentation you want to embed 3. Click on “embed” 4. Copy the code that appears (highlight and press “ctrl” and “c”) 5. Go to your website and/or blog a. How you enter embed codes varies from website to website b. Make sure you have a choice where you can enter html (code language) c. Paste the coped embed code (press “ctrl” and “v”) d. Save/publish Edmodo is a great tool to use in the classroom. 1. go to https://cobbk12.edmodo.com/ 2. Select "teacher" 3. You will need a "school code" You can get this code from the technology coordinator/leader for your area 4. Put in your first name 5. Put in your last name 6. Enter your CCSD email address 7. Create a password After you login, you need to join our class. 1. Click on the "plus" sign in the "groups" tab 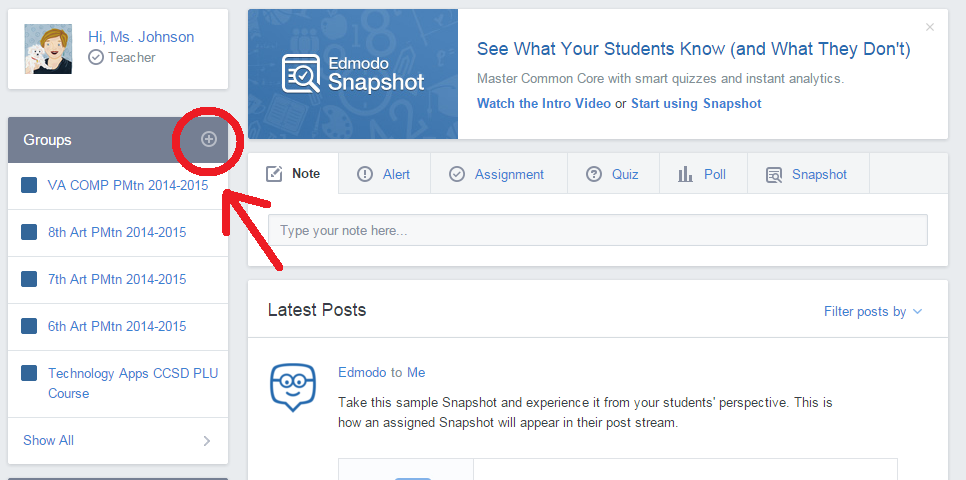 2. Type in our group code: 6qdkai
3. Ta-Da! You are added to our group! :) Tonight, we are going to begin by creating a teacher website in Weebly.
Before your go digital ask yourself - 1. What is my website about? For example, it could be about the Library, a class, a group of classes, or a way for you to put presentations for students. 2. How do I want to organize my website? How do you want the different pages of your website to be organized? According to class? According to grade level? According to subject? 3. What information do I want to have on my site? Are you basically sharing blog posts for what is happening in class each week? Are you sharing syllabi? Homework assignments etc. Getting Started 1. go to www.weebly.com 2. sign-up or log-in (signing up go to step 3; logging-in go to step 7) 3. when asked, choose "site" 4. choose a theme for your site; you can change your theme later if you don't like it. 5. choose a website name. Your website will be whatevernameyouchoose.weebly.com 6. choose "build my site" 7. click on "pages" at the top. Your pages are the menu options on your home page 8. I recommend making your pages aligned to the classes you teach 9. When you "add" a new page - I recommend choosing "blog" page b/c it is easiest to edit 10. CLICK "PUBLISH" TO SAVE!!!! Don't like your theme? 1. click on "design" at the top of the page and choose "change theme" Want to add elements to your page? Drag and drop page option from the left-hand side menu. Don't worry about what happens after your drag-and-drop; Weebly will walk you through it Feel like you're at a good stopping point? Post the URL of your website on our group Edmodo page. Comment on the work of at least 2 of your peers. Our group page: https://cobbk12.edmodo.com/home#/group?id=7049505 Our group code: 6qdkai | ArchivesAuthorWrite something about yourself. No need to be fancy, just an overview. Categories |
 RSS Feed